OBS Multi Track Recording and Editing
OBS is a popular screen recording and streaming tool. It's open source and available for all major platforms.
Usage of OBS is pretty straight forward. Select your source(s), hit record and off you go. However, OBS has quite a few more options to play with. One of those I found extremely valuable recording podcasts is the ability to record multiple audio tracks.
Activate multi track recording in OBS
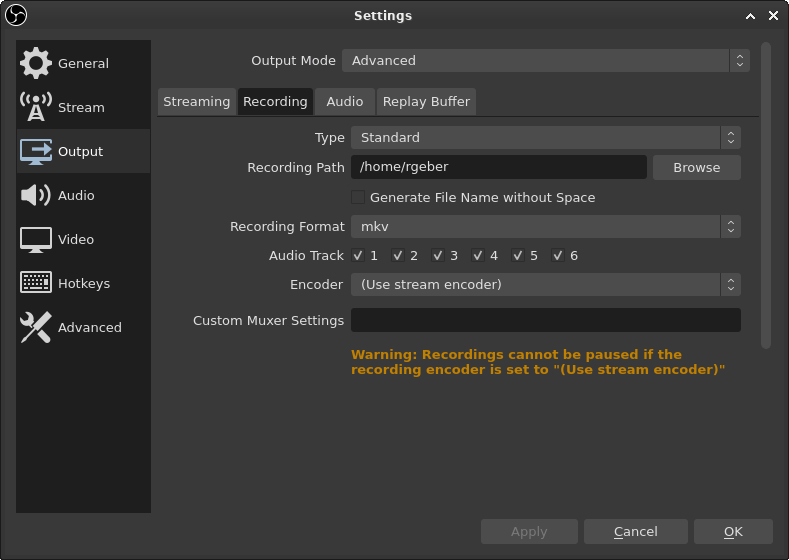
To activate multi track recording go to Settings -> Output -> Recording

There you'll find the Audio Track option offering up to six check boxes. Choose as many tracks as you need. OBS will then create an output file containing those tracks.
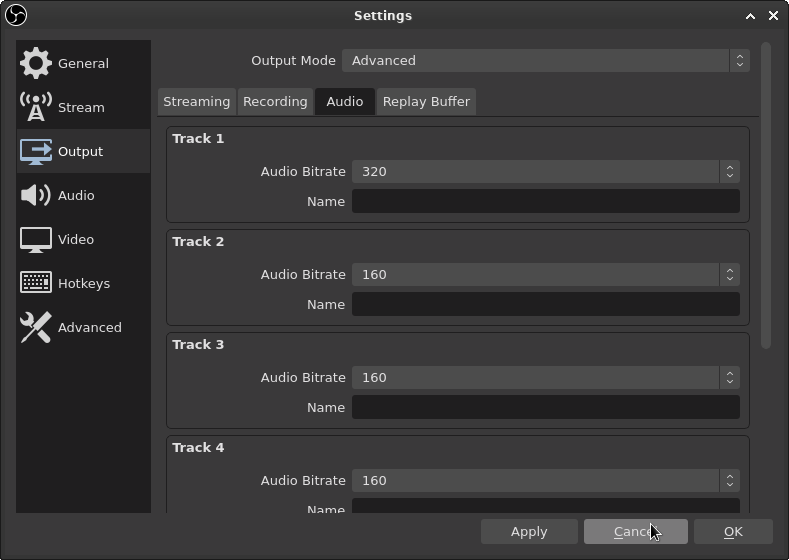
In addition to that you may set the bitrate for each track under Settings -> Output -> Audio. This step is optional.

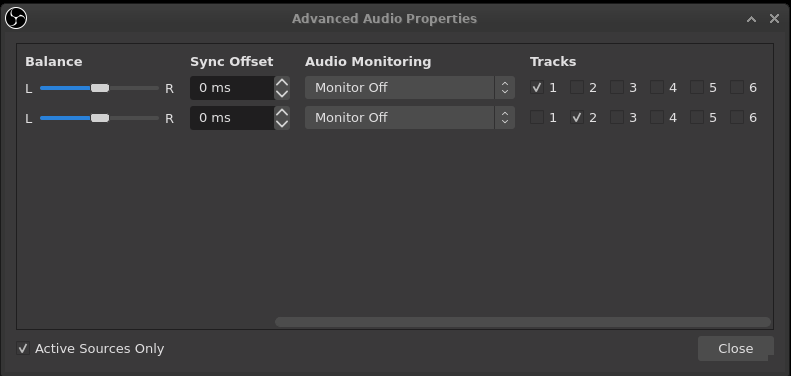
Lastly, assign your sources to different tracks. Open the Advanced Audio Properties located in the Edit Menu. Here you see a list of all your sources including the option to assign audio tracks to it.

Extract Audio tracks
Players like VLC allow you to select the audio tracks you'd like to listen to. However, sometimes the output file is not (fully) understood by the editing tool you're using. An example would be the lack of an mkv processor in Resolve or the availability of only the first track in kdenlive.
Using ffmpeg you can extract each track into a separate file making editing a more flexible.
First query the file for some information
ffmpeg -i recording.mkv
This will yield something along these lines:
ffmpeg version n4.2.3 Copyright (c) 2000-2020 the FFmpeg developers
  built with gcc 10.1.0 (GCC)
  configuration: --prefix=/usr --disable-debug --disable-static --disable-stripping --enable-avisynth --enable-fontconfig --enable-gmp --enable-gnutls --enable-gpl --enable-ladspa --enable-libaom --enable-libass --enable-libbluray --enable-libdav1d --enable-libdrm --enable-libfreetype --enable-libfribidi --enable-libgsm --enable-libiec61883 --enable-libjack --enable-libmfx --enable-libmodplug --enable-libmp3lame --enable-libopencore_amrnb --enable-libopencore_amrwb --enable-libopenjpeg --enable-libopus --enable-libpulse --enable-libsoxr --enable-libspeex --enable-libsrt --enable-libssh --enable-libtheora --enable-libv4l2 --enable-libvidstab --enable-libvmaf --enable-libvorbis --enable-libvpx --enable-libwebp --enable-libx264 --enable-libx265 --enable-libxcb --enable-libxml2 --enable-libxvid --enable-nvdec --enable-nvenc --enable-omx --enable-shared --enable-version3
  libavutil      56. 31.100 / 56. 31.100
  libavcodec     58. 54.100 / 58. 54.100
  libavformat    58. 29.100 / 58. 29.100
  libavdevice    58.  8.100 / 58.  8.100
  libavfilter     7. 57.100 /  7. 57.100
  libswscale      5.  5.100 /  5.  5.100
  libswresample   3.  5.100 /  3.  5.100
  libpostproc    55.  5.100 / 55.  5.100
Input #0, matroska,webm, from '2020-06-08 00-13-25.mkv':
  Metadata:
    ENCODER         : Lavf58.29.100
  Duration: 01:23:31.03, start: 0.000000, bitrate: 2725 kb/s
    Stream #0:0: Video: h264 (High), yuv420p(progressive), 1280x720, 30 fps, 30 tbr, 1k tbn, 60 tbc (default)
    Metadata:
      DURATION        : 01:23:31.033000000
    Stream #0:1: Audio: aac (LC), 44100 Hz, stereo, fltp (default)
    Metadata:
      title           : Track1
      DURATION        : 01:23:30.913000000
    Stream #0:2: Audio: aac (LC), 44100 Hz, stereo, fltp (default)
    Metadata:
      title           : Track2
      DURATION        : 01:23:30.913000000
    Stream #0:3: Audio: aac (LC), 44100 Hz, stereo, fltp (default)
    Metadata:
      title           : Track3
      DURATION        : 01:23:30.889000000
At least one output file must be specified
The most relevant part here is the list of tracks. Here we see one video and tree audio tracks. In this case each track is aac encoded but make sure to check your encoding for the next step.
To extract the audio tracks map each track to a separate file. The following example maps tracks 0 to 2 (three tracks in total) to separate aac files. There's no encoding, just copying. So no worries about losing quality.
ffmpeg -i recording.mkv \
-map 0:a:0 -c copy audio1.aac \
-map 0:a:1 -c copy audio2.aac \
-map 0:a:2 -c copy audio3.aac
These files are then easy to use in your chosen editors independent from the original source.
For more information check out this thread on Stackoverflow which inspired this solution.